Tuesday, January 14, 2014

"Pea Soup", England and Crochet!

Looking down my street!
While writing this blog, I am looking at the weather outside. It is not real cold and for that I am grateful, but it is very foggy. Living only 200 yards from the ocean (well actually the Gulf of Mexico) the fog is rolling in. I know there is a correct term concerning the dewpoint and the temperature, but I can't keep up with all of it. The best description I can give is a term that my dear English friend uses. She says the fog is as thick as pea soup!


 And speaking of English friends, I have a new one and her name is Sue Dougill. She is my guest blogger today! Now, Sue is not a quilter, but she does do hand work and that just goes along with my theme for this month and the months to follow.


Sue is known as Crochet Addict UK. 


She became a crochet addict in 2011 when she learned  to crochet due to her health issues. She suffers from Chronic Fatigue Syndrome & M.E. When she learned  to crochet she knew she had found her craft. As she puts it, "Everything just clicked".
The first item she designed was a dinosaur hat for her son.  It was such a hit, she soon started receiving requests from his friends and as they say the rest is history.

Her favorite designs are characters and animals as she loves to make people smile. Because of her health, she can't make vast quantities, so she concentrates on designing items. She not only designs items, but helps promote other crafters and hosts giveaways. Sue says she feels part of a community and it's a community she loves to promote.


Welcome Sue!

Hi I would first like to say thank you to Nan for letting me be a Guest Blogger on her blog.

My name is Sue and I am known as Crochet Addict UK

I started to Crochet in 2011 and instantly became an addict. The first pattern I ever designed was for a Dinosaur Hat & Scarf for my son.

I loved designing so much I couldn’t resist carrying on. I suffer from CFS (Chronic fatigue syndrome – also known as M.E.) and am unable to make large quantities so I’ve specialized in designing items. I love the fact that every time I pick up a hook something magical seems to happen.


My favourite design is my Dragon Hat. My son was a big influence and had a big input on this project. He is my biggest critic!
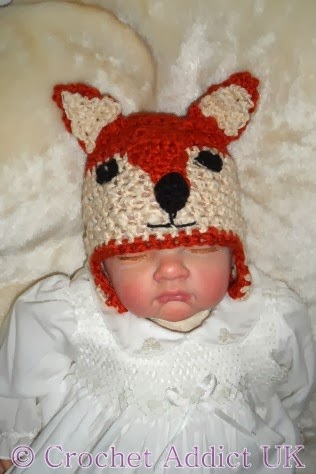


My latest design is a baby fox hat.

Not long after starting to Crochet I set-up a blog http://www.crochetaddictuk.com  to keep a record of the things I was making and to share things with other Crocheters. Since starting it has now expanded to share a love of everything handmade. I love to use my blog to promote and share with other people, crafts and handmade items.  This last Christmas was the first time I tried to make as many presents as possible. Not all were met with the love that I had put into them but I was proud of myself for making so much.  We even made our own soaps, chutneys and other wonderful things.

My latest adventure is with needle felting. We will see what happens!
Sue


Sue, I want to thank you so much for being my guest blogger and for sharing all your lovely designs with us. To learn more about Sue - please check out her blog! Also I will be a guest on Sue's blog in February. I will post the date soon. 

Meanwhile - just a short note to let you know that I will be a guest on Canadian Quilt Talk this Thursday, January 16th at 4:00pm PST. I hope you will join me!

Also sign up for my newsletter!

Until next time - Enjoy your favorite hand work no matter what it is. 

Tuesday, January 7, 2014

Never say Never!

I had a good friend many years ago that made all her quilts by hand. She tried so hard to get me interested and even gave me a little kit for a pillow with the fabric squares already cut out. But I was working on cross stitch and needlepoint at that time and I was not interested in quilts.

Well that finally changed and I started quilting. I love to sew and I had been sewing most of my life. I made most of my clothes and really enjoyed sitting at the sewing machine.

Of course I figured, well I sew, so quilting will be a piece of cake - wrong. There were so many new things to learn and the seam allowances were different. I had been dealing with yards, not fat quarters. But the fact that I was comfortable with a sewing machine made the transition easier and I had a very good teacher!
I also found two books that were very helpful.


One is by Carol Doak - Your First QUILT BOOK (or it should be!) and the other is by Ellen Pahl - The Quilters Ulimate VISUAL GUIDE. Both of these books have been invaluable and I refer to them time and again!


I loved making quilts and I could whip up the tops very quickly. Somebody mentioned hand quilting and I said NEVER! I don't have enough time in the day.

Well, that was true, I didn't have enough time in the day - but what about the nights! I love to sit with my husband and stitch while he reads or we watch TV. Just a relaxing night. I was doing cross stitch, but I started wondering about piecing fabric.

I also had the opportunity to take a class by Jinny Beyer and I got her book - Quiltmaking by Hand. I was hooked. Her book was so inspiring with lots of stories regarding quilts and all the history, etc. She even had patterns and I choose one on a cold rainy day in January using my stash.


 It is a King Size Quilt (wouldn't you know I didn't start small?) and it is on our bed today. When I started it, I had no idea about how it would end up, I just started piecing. Here is the result.


Well from then on I was hooked on hand-piecing. I have hand-pieced 6 quilts (some for me and some for family and friends). I have even designed several patterns. One is " Denny's Hopscotch Quilt" available on my website. It was originally for my husband, but it was soon claimed by Denny when he was still with us. It will always be his quilt and it will always be my favorite.

Another of my hand-pieced quilts will be featured in the February issue of The Quilt Pattern Magazine. This particular quilt was hand-pieced using Inklingo. Linda Franz loves hand-piecing and created Inklingo to make it so easy. But you will hear more about that next month!

I have recently started applique and using Cindy Mccoy's patterns from The Quilt Pattern Magazine, I have made these blocks. I have just finished the third block in the table runner, so I will be posting that soon.


And I am quilting another quilt with one of Jinny Beyer's patterns using some of my favorite fabrics with fall colors. This one is just so much fun.

So it just goes to show - Never Say Never!


One more thing - if you haven't signed up for my monthly newsletter,  just go here!

Friday, January 3, 2014

Happy New Year


2014 is going to be a very exciting year with lots of new, fun and interesting challenges. The first one for me is the publication of my very first newsletter –
Purrfect Spots "Mewsings"!

There will be some interesting topics, articles and even a Square One Share!


Friday, November 22, 2013

A Quick and Easy Advent Calendar

I was shopping with my friend earlier this week. She saw this fabric and loved it. The colors were "purrfect" for her new house for Christmas. But she didn't know what she would do with it. Her daughter already had fabric for a table runner so she reluctantly put it back.

I went back and got 2 yards having no idea what I would do, but knew how much she wanted it. Then I decided an advent calendar was the way to go. OMG - it is November 20th - there's just 10 days before December 1 and Thanksgiving is right in the middle of that! I had to work fast. So this is what I did.


 I cut the fabric in half and put one half aside for the backing. With the remaining half, I made folds to be like rows that were three inches deep. I made 5 rows.


 I then pinned the rows together and stitched both sides to keep the folds together.


I then measured across the a row adding pins approximately 4" or 4 1/2" apart to create 5 pockets in the row.


Next I lined up my pins along the rulers edge on each row. I didn't have time to see if my invisible ink would really be invisible on the white part of the fabric and I knew I was not going to wash it once it was made, so I just "eyeballed" it to get it as straight as I could. You may wish to do it differently, but as time was not a luxury for me, I did what I could.


I sewd one row from top to bottom and then I measured from that stitching and sewed the next row. I only had to sew four rows from the top of the fabric to the bottom of the fabric to make five pockets on each row. Now I know most advent calendars only go to December 24, but I am adding an extra day and I will tell you why later.


Once all the rows were made, it was time to make the numbers. I went to my computer and printed out what looked like to be an easy font to draw.  I found a red fabric in my stash that matched. Fortunately I remembered that I needed to reverse the numbers on my fusible sheets. That would not have been much fun at all to have to redo them all.

This truly was the slowest part as drawing and cutting out the numbers was very painstaking at times. There were numbers everywhere and when I started adding them to the calendar, I realized that I couldn't count as I needed an extra 1, 2 and 0.

Once all the numbers were added, it was time to add the backing. Now I decided that I didn't want to do binding as that takes some time (which I didn't have) so I decided to put it together much like I do the Kennel Quilts for animal shelters. I will give you more information on that after the tutorial.


Using the leftover piece of fabric that I had put aside earlier, I placed it right side up on the table. I then added the advent calendar top with the right side face down and then I added the batting on top of that. I trimmed the batting to fit the fabric. So the right sides of the fabric are together with the batting on top.

I
 I then stitched around the calendar but left a 16 inch opening at the top so I could turn it and add a sleeve.


I trimmed the corners and then turned it inside out. I added a piece for the sleeve at the top and stitched it on when I stitched the top.


I then quilted the top by outlining some of the trees and I quilted in between each row. The hard part is done. I may add a few sequins or beads on the trees for sparkle, but it will depend on my time. Nevertheless I am very pleased with the way it turned out and how quick and easy it was.


 Before I give it to my friend, I plan on stuffing each pocket with  little candy canes and a note of what the kids can do each day - like give Mom and Dad a hug, take the dogs for a walk - you get the idea. As you see my calendar has 25 days and I plan on adding a note with the reference to the Christmas Story from Luke in the Bible for that day. It is one of my favorite scripture passages from the gospel of Luke, chapter 2 - verses 1 through 20.

Now as to Kennel Quilts for animal shelters - The Quilt Pattern Magazine has all that information and you may find it by clicking here! 

I hope you have enjoyed this tutorial and if you make an advent calendar, please share. Thank you and have a Happy Thanksgiving, a Merry Christmas and Happy & Safe Holidays!

Nan


Friday, November 1, 2013

Northern Lights - the 10th Bear in the Bullas Bears Quilt.

This little guy has decorated himself instead of the Christmas tree. He is ready and waiting for Christmas! He is called "Northern Lights" and the 10th and final block in my Bullas Bears BOM.
He is from the art work of famous watercolorist, Will Bullas.


Here is Will's picture:


 Here is my quilt adaptation:


The Bullas Bears BOM is featured in The Quilt Pattern Magazine. This is block #10 and the final block. Bali Hand-dyed Watercolors - Style #1895 from Hoffman Fabrics were used in this quilt as they are just "purrfect" for these bears! Batiks Plus is offering the Fabric Kits. Kreinik Threads is offering a thread kit featuring the speciality threads used with this quilt. 

So how can you join in all this fun? As the pattern is only available through The Quilt Pattern Magazine, all you have to do is SUBSCRIBE today! You will love making these Bullas Bears!

Tuesday, October 1, 2013

Polar Prayer - the 9th Bear in the Bullas Bears Quilt.


Even bears pray or so one would think with this guy by the Christmas tree.
This is the 9th block in the Bullas Bears BOM (block of the month). This block is called - Polar Prayer. You can feel the stillness in the night.
He is from the art work of famous watercolorist, Will Bullas.


Here is Will's picture:


 Here is my quilt adaptation:


The Bullas Bears BOM is featured in The Quilt Pattern Magazine. This is block #9.
Bali Hand-dyed Watercolors - Style #1895 from Hoffman Fabrics were used in this quilt as they are just "purrfect" for these bears! Batiks Plus is offering the Fabric Kits.
Kreinik Threads is offering a thread kit featuring the speciality threads used with this quilt. 

So how can you join in all this fun? As the pattern is only available through The Quilt Pattern Magazine, all you have to do is SUBSCRIBE today! You will love making these Bullas Bears!


Thursday, September 5, 2013

Santa's Cookies - the 8th Bear in the Bullas Bear Quilt

Start you holiday baking so you can have cookies ready for Santa.This little bear hopes his cookies will do the trick for some wonderful presents. He is shy but very hopeful.  This is the 8th block in the Bullas Bears BOM (block of the month). This block is called - Santa's Cookies.  What a happy little guy!
He is from the art work of famous watercolorist, Will Bullas.

  Here is Will's picture:


 Here is my quilt adaptation:


The Bullas Bears BOM is featured in The Quilt Pattern Magazine. This is block #8.
Bali Hand-dyed Watercolors - Style #1895 from Hoffman Fabrics were used in this quilt as they are just "purrfect" for these bears! Batiks Plus is offering the Fabric Kits.
Kreinik Threads is offering a thread kit featuring the speciality threads used with this quilt. 

So how can you join in all this fun? As the pattern is only available through The Quilt Pattern Magazine, all you have to do is SUBSCRIBE today! You will love making these Bullas Bears!